Thursday, 24 October 2013

Convert Land Plots to a Different Coordinate System

I had a query recently about how to convert digitised plots of land from one coordinate system to another in Civil 3D. This is similar to a previous post, so here is a different way of doing the same thing effectively with possibly less steps.

First open the drawing with the plots to be converted. Set the current coordinate system in the drawing by using the MAPCSASSIGN command. Then export the polygons to SDF(or SHP or whatever you wish) file format by typing MAPEXPORT. Choose the polygons/layers that you wish to export. On the Options tab you can specify a coordinate conversion as part of the export, see below:
Now in a new drawing (with or without the second coordinate system set), type MAPIMPORT and select the file exported previously and it will import your plots to the new coordinates.

Monday, 21 October 2013

Old Land Desktop Poster

Found this in the office a while back.... Loving the guys quote at the bottom! clearly very excited about it!

Monday, 14 October 2013

Autodesk Autotrack

While I am making announcements I may as well blow the trumpet one more time!

With the purchase of Autotrack by Autodesk from Savoy on 19th August 2013, Amicus Technology, with their longstanding specialisation in Infrastructure and Road Design software,  have been recognised by Autodesk as one of only four Key Autotrack Partners worldwide for sales and support of the new Autotrack product, including the creation of new vehicles and swept-path analyses.

What does this mean for users? Well as in the previous post about the Civil Infrastructure specialisation it means that by engaging with us you are tapping into Amicus' knowledge, expertise and commitment to implement and support your use of Autotrack. We have been the sole Autotrack Authorised reseller here in Ireland for the past number of years. We have been selling and training Autotrack as well as undertaking vehicle creation and trackings for customers both here in Ireland and the UK during that time.

The most immediate thing that seems to have affected casual users of Autotrack since the purchase by Autodesk is the removal of the rental option. Casual users who maybe needed the software three or four times a years would previously have rented the software for a week and completed their work. Now that this option has gone under Autodesk it does not pay for them to purchase a full licence. Amicus Technology, as one of the recognised key partners, can (and have been) bridge the gap for Autotrack users by providing the vehicle creation or swept path analysis service direct to the user.

For queries or a quote please contact me on donal.mcmoreland@amicustec.ie

Saturday, 12 October 2013

Autodesk Specialisations

Amicus Technology Earns Autodesk Civil Infrastructure & Consulting Specialisations
 
Amicus Technology recently became the first and only Irish Autodesk Partner to have earned the Autodesk Civil Infrastructure & Consulting Specialisations, and is one of only 3 such Partners in the UK & Ireland.
 
What is it?
As an Autodesk Specialised Partner, Amicus Technology has shown that they have made significant investment in people and systems, they have a business plan specific to their specialisation area, they have a range of customers for whom they have successfully carried out Civil Infrastructure consultancy, and that they can offer a high level of technical background and support to customers in the Civil Infrastructure industry.
 
The new Autodesk Partner Specialisations enable value added resellers to highlight and brand their expertise in delivering services in key industry areas. By completing the required curriculum and training, as well as meeting required levels of service and standards set by Autodesk, Amicus Technology demonstrates it can be a trusted adviser to Autodesk customers throughout the world.
 
How do you benefit?
By engaging with Amicus Technology you are working with a leader in Autodesk’s BIM for Civil Infrastructure solutions, tapping into their knowledge, expertise and commitment to implement and support your use of Civil BIM technology to streamline workflows, reduce costs, shorten project times and improve design quality.  

Not your Average Volume Calcs.

In some customised training recently I had a question on calculating the volume of material that was dumped on the side of an existing road. It turned out to be less straight forward than initially expected. The existing road is higher than the ground around it and original had a 2:1 embankment - that is all the information provided on the original condition. The fill material was dumped on top of this embankment. No survey existed for the original embankment so we had to somehow recreate the original ground level before we could calculate the volume of dumped material.

Belo is a screen shot of the current situation with a section through the fill to be quantified:
Manually drawn on one section below is the volume we need to calculate:
What we need to do is recreate the original field levels and road embankment at 1:1 to do our volume calculations - for simplicity we are going to assume the slope of the field continues in at the same grade towards the road:
 
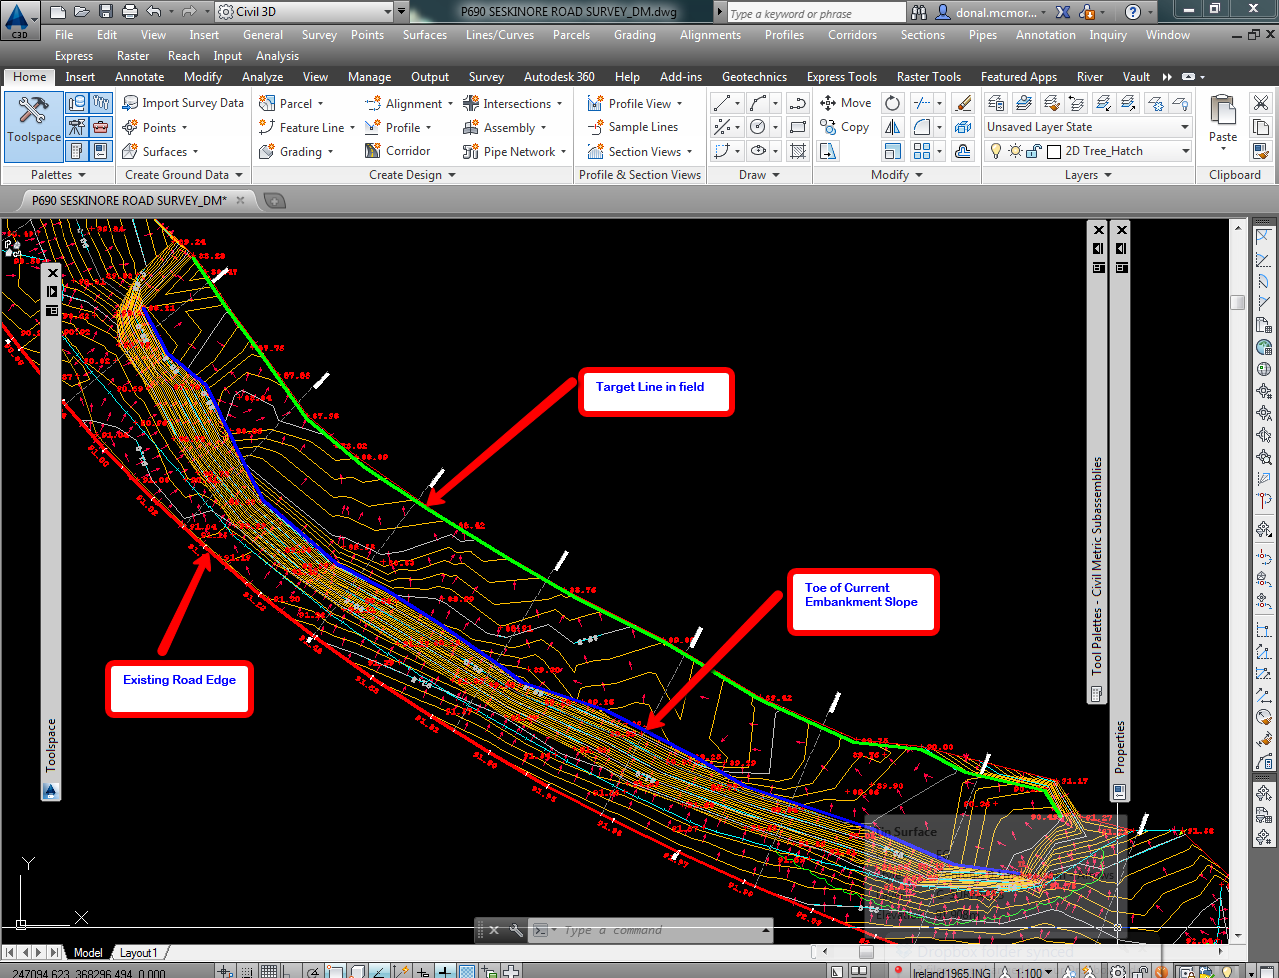
In plan below you can see the toe of current embankment - blue line. Red line is the road edge. 
To recreate the original field slope where the material was dumped we are going to use the overlaywidenmatchslope subassembly to build a corridor and get it to look at the existing field slope and continue this back in towards the road. Insertion point is toe of current slope and setting a target (green line) further out in the field will enable the assembly to calculate the slope of the field. 
The resulting corridor surface is shown below in purple. (actual slope may have been different but it is a good estimate). 
Next build another corridor with a linkslopetosurface subassembly. Alignment is existing road edge and existing profile. We will target the surface from the first corridor. 
The resulting corridor surface is shown below. We now have a good estimate of what the original ground levels were like before the material was dumped. 
Next to calculate the volumes we can define a material bounded by the three surfaces. 
 Volumes report below. 


Wednesday, 7 August 2013

Recap to Civil 3D

This post outlines a workflow to import a point cloud into Recap, edit it, export a section of it to Civil 3D and then create a surface from it in Civil 3D.

I would imagine this is a work in progress given the series of steps that you have to go through to import a section of the point cloud into Civil 3D, see what you think.

Recap:
First of all import your raw point files into Recap, click on New Project:
Browse to your raw files and click next. You can edit the settings here to remove noise, or specify the minimum space that any one point can occupy (decimation grid).
After importing the raw files, if you browse in windows explorer to the folder where the raw files were you will notice that there is now an .rcs file. This is the Recap indexed point cloud file. When you want to import the point cloud into any of the other Autodesk software packages it is this rcs file that you import.
Once you have your point cloud in Recap the first thing that you may notice is that the point cloud doesn't appear to be as dense or as detailed as you would expect, or that there appears to be sections (strips) of points missing.
This is purely a visual thing, all your points are there! There are a few changes that you can make to improve the appearance....
 
The points are lit from either one or two sides by default. Turning this lighting off improves appearance.
Secondly you may need to adjust the point cloud origin so that it is on or near the points themselves or the area of interest.
Follow the prompts on the screen. For this example I chose a point on the road surface and pressed the TAB key to flip the axis so that the 'Z' axis was in the correct direction.
You can also reduce the point size which will also impact appearance.
The result will be a much clearer looking point cloud:
The next thing we need to do is to clip out the portion of the point cloud we wish to import into Civil 3D. I am going to clip out a section of the road and then edit this to remove any points that I do not need, such as the trees you see on the left in the screen shot above.

Use the window or fence select tool to highlight the area you wish to keep...

Then click on Clip Inside to hide these points. Use the select tool again to select the remaining points...
...and click on delete. Click on Unclip All to restore the points of interest. Next use the fence selection to select the points comprising the road and verge...
...repeat the clip inside, delete, unclip procedure until you are left with only the points you want.
Once you have tidied up your section of interest it is important to point out here that the edits you are making are not saved back to the rcs file. The only way I have found of being able to effectively save these changes to an rcs file is to export the points to a raw point file format first and then reimport them back into Recap so that it creates a new rcs file. To do this click on export first...
Select a file format to export to and wait...
Next start a new Recap project and import the file you just exported. This then creates an rcs file for just the edited section of points, which you can then import into C3D...

Civil 3D:
In Civil 3D then, go to the Insert tab of the ribbon, click Attach and browse to your edited rcs file...
Your point cloud will appear in C3D..
In order to create a surface from this in Civil 3D you will need to give the Recap point cloud Civil 3D properties.. click on the point cloud and on the ribbon click Add Civil 3D Properties...
Once you have done this, click on the point cloud again and select Add Points to Surface on the ribbon. Before you do this however make sure that your viewport visual style is set to 2D Wireframe or else it will not add the points. See screen grab below, just however your mouse around this area of the screen and you will be able to change the style.
You can also change the view style from the View tab of the ribbon.
Once the surface is created you may find that it is far too dense for your requirements. For example I have a point every 5mm in my example which is complete overkill for what I need. You can simplify your surface to remove points. Select your surface and choose Simplify Surface.
Select Point Removal as the simplification method
On the last tab you specify the max change in level between adjacent points, it removes points based on these settings. An in depth explanation of how this works can be found in the help menu.
One thing to note here is that when you click finish it runs the simplification. So if you click Apply and then finish it will run the simplification twice and possibly remove more points than you had planned.
 
All of the above amounts to a pretty long winded workflow to create a surface from a point cloud in Civil 3D. It works well but there is room for improvement, for example when you trim the point cloud in Recap you should be able to save this out as an edited rcs file without the extra export/reimport steps. 


Thursday, 1 August 2013

Digitising Property Folios

We have had a number of queries recently from people looking for a quicker way to digitise property folios from the land registry in Ireland. It appears that people are requesting PDF or paper hard copies of the folios, importing them into their CAD package, positioning and tracing over them, adding their own info and resubmitting them to the PRA.

This is a very slow process and an unnecessary one too! You can request folio information in digital format and import this straight into the likes of Civil 3D or Map 3D. Request the folios in shape (SHP) file format. There may be an initial search cost but after that the cost is the same per folio as for the paper or PDF format... except you don't have to do all the tedious positioning and digitising in CAD.

To import the shape files use the following workflow (just change files of type to shp):

http://civilintentions.blogspot.ie/2012/01/connecting-to-mapinfo-files-in-civil-3d.html