We have had a number of queries recently from people looking for a quicker way to digitise property folios from the land registry in Ireland. It appears that people are requesting PDF or paper hard copies of the folios, importing them into their CAD package, positioning and tracing over them, adding their own info and resubmitting them to the PRA.
This is a very slow process and an unnecessary one too! You can request folio information in digital format and import this straight into the likes of Civil 3D or Map 3D. Request the folios in shape (SHP) file format. There may be an initial search cost but after that the cost is the same per folio as for the paper or PDF format... except you don't have to do all the tedious positioning and digitising in CAD.
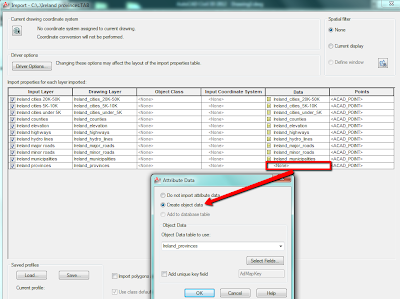
To import the shape files use the following workflow (just change files of type to shp):
http://civilintentions.blogspot.ie/2012/01/connecting-to-mapinfo-files-in-civil-3d.html
Showing posts with label Map 3D. Show all posts
Showing posts with label Map 3D. Show all posts
Thursday, 1 August 2013

Tuesday, 15 May 2012
Easy Access to Map 3D Commands in Civil 3D
One of the great things about Civil 3D is that it contains a whole suite of GIS tools in the form of Map 3D commands. These can be accessed by entering them at the command line if you can remember them. You can also access them on the ribbon by switching to the Planning & Analysis workspace.
 If you need to use these commands as part of a Civil 3D workflow it can become a bit frustrating switching back and forth between workspaces. A more efficient way of working is to use the Map drop down menu (the menus that Autodesk keep hiding by default!). The map menu will provide you with quick access to the Map 3D commands in Civil 3D.
To display the Map menu follow these steps:
Type CUI at the command line and press Enter to open the Customize User Interface dialog box. On the Customize tab under the Customizations in All Files panel scroll down to and expand Partial Customization Files. Right click on Partial Customization files and select Load Partial Customization file.
 Browse to the following file (Windows 7): C:\Users\USERNAME\AppData\Roaming\Autodesk\C3D 2013\enu\Support\MapClassic.cuix. Select Open. Click Apply and OK.
Finally to display the drop down menus in Civil 3D type MENUBAR at the command line and set the value to '1'. The Map menu should now be added to the list of menus at the top of your screen.
So for example I was using a lot of aerial photography in a recent project. Each image tile had a world file associated with it to enable it to be georeferenced to the correct location. To import the imagery and georeference the images using the info. in the world files you need to import using the Map image insert command rather than the normal AutoCAD image attach. This can be found easily on the Map drop down menu... nice and easy to access..
 Using the Map drop down menu along with the map workspace (MAPWSPACE) gives you (easy) access to most of the Map 3D commands in Civil 3D.

To display the Map menu follow these steps:
Type CUI at the command line and press Enter to open the Customize User Interface dialog box. On the Customize tab under the Customizations in All Files panel scroll down to and expand Partial Customization Files. Right click on Partial Customization files and select Load Partial Customization file.

Finally to display the drop down menus in Civil 3D type MENUBAR at the command line and set the value to '1'. The Map menu should now be added to the list of menus at the top of your screen.
So for example I was using a lot of aerial photography in a recent project. Each image tile had a world file associated with it to enable it to be georeferenced to the correct location. To import the imagery and georeference the images using the info. in the world files you need to import using the Map image insert command rather than the normal AutoCAD image attach. This can be found easily on the Map drop down menu... nice and easy to access..

Tuesday, 8 May 2012
Accessing Aerial Imagery in Civil 3D
The guys at Autodesk Labs have released a really cool and very useful new tool for Civil 3D and Map 3D. It allows you to connect to Bing Maps (Microsoft) from within your drawing and provides access to aerial imagery and road information quicker than I have ever managed to get it in there before! No messing around with world files or scaling and manipulating image tiles...
Below is a screen grab of my site before I connect to the mapping. There are a number of roads, existing dwellings and a railway running across the south of the site. All of this of course would be easier to make out if we had some aerial imagery.
 1. To connect to the mapping you will first need to assign a coordinate system to your drawing. Type MAPCSASSIGN at the command line and search for your coord sys. Use a filter if you know part of it's name.
 2. The utility provides a new connection in the data connect tools. To open these tools type MAPWSPACE at the command line and then click on the Data Connect button in the dialog box that appears. This opens the Data Connect dialog box below. Highlight Add Basemap Service Connection and click Connect. this makes a connection via the internet with Bing Maps.
 Select the data layers you want to add to your drawing and click Add to Map.


 A good addition to this tool might be the ability to enter into street view from directly within your drawing. I have found street view very useful on previous jobs when you are back in the office after completing a survey. If some of the line work doesn't make sense or you cant remember what was happening on the ground at a particular point (and you haven't taken a photo!) - just use street view to refresh your memory. The only problem at present is that you have to jump back and forth between Bing maps or Google Earth and your drawing to do this... food for thought...
Below is a screen grab of my site before I connect to the mapping. There are a number of roads, existing dwellings and a railway running across the south of the site. All of this of course would be easier to make out if we had some aerial imagery.


The information is added to the map within the limits of the coordinate system. It appears to use information from the coordinate system to run a query on the Bing Maps to determine the amount of information it pulls down to your drawing. This query will update if you change your coordinate system after you have connected. This is handy if you pick the wrong coordinate system initially, just re-run the MAPCSASSIGN command and choose the correct one -the mapping will update automatically.
You can use the layer controls to turn off some of the information. In my case I just want to see the aerial imagery. The large red circle I drew myself so I could locate where the project is.

The quality is pretty decent as you can see below... The only draw backs with this tool are that you cannot save the maps (Im not sure if this is that big of a deal though as you can print the information) and it is also only available on the Labs website until 30th June. Other than that this is a great new tool and a great direction for the software to be heading... The tool is called Project Basejump and its also free, download and test it out HERE

Thursday, 12 January 2012
Connecting to MapInfo files in Civil 3D & Map 3D
There are a couple of ways of connecting to MapInfo data in Civil and Map 3D...
- Use the MAPIMPORT command
- Download the free FME FDO provider to allow connectivity to MapInfo files through the standard Map and Civil 3D FDO
We will explore both methods here and also look at the pros and cons of both.
1. Using the MAPIMPORT command.
On the command line type MAPIMPORT. Browse to the data files and change the files of type to suit.

Select the files and click OK. In the import dialog box for each layer under the data column, click where it reads none and select to create object data - this will add the object data present in the MapInfo files as attributes to the AutoCAD objects (tip here to create polylines instead of mpolygons is to set the MAPUSEMPOLYGON variable to OFF) created on import.
After importing the data we can inspect the properties of the imported objects. Below we see that the selected polyline has been placed on an AutoCAD layer with the same name as the MapInfo file it was imported from. Also we can see that the object data has been added as an attribute to the polyline - the province name in this case.

The data is imported in AutoCAD format. The control of the display of the imported objects is achieved through use of AutoCAD commands - layers, draw order etc... as you would with any AutoCAD objects. We cannot perform any GIS analysis on the data - for example to stylize or query the objects based on the attached attribute data. In summary importing using the MAPIMORT command is useful to create AutoCAD drawings from the MapInfo files but leaves us limited in terms on controlling the display of and analysing the data.
Using the FDO connection provides us with more control over the data...
2. Use the FDO data connect
The out of the box FDO in Map and Civil 3D does not allow connectivity to MapInfo files. Luckily there is a add-on that will enable connection to 9 additional formats including MapInfo TAB, MIF/MID and SPATIALWARE...

The add-on, developed by Safe Software, is free and can be downloaded from the following link:
Once installed you can access the new connections through the FDO in Map or Civil 3D. On the command line type MAPWSPACE and press enter twice. This brings up the Map workspace. Click on DATA icon and connect to data...

...here you will see the usual data connection formats plus an extra one entitled Add FME connection. Double click on this and select MapInfo Tab as the file format. Browse to the files, select and open.

Back in the data connect dialog box select the tick boxes to display the schema and click on Add to Map

The selected files are added as Map 3D layers to the drawing...

...this allows you to control the draw order easily through Map task pane by dragging and dropping layers to change their order.

You can also easily control the display of layers by checking or unchecking the tick box beside each.
You an also view the object data associated with each layer in table format. In the table you quickly zoom to a particular feature by right clicking on one and selecting zoom to.

To do this, first change the draw order of the layers to bring the layer you are going to stylise to the top. Highlight the layer in the Map Workspace and click on style, select new theme and choose the property upon which you wish to stylize the layer. Then change the colour of the style range to suit.

Once this is complete the layer style will update automatically in the drawing.

In summary using the FDO data connect in Map and Civil 3D provides you with far greater control over the data than using MAPIMPORT, for both display and GIS analsyses.
Subscribe to:
Posts (Atom)